
Sewing Space Series: Cutting Table Tutorial
In the Sewing Space blog series I’m going to walk through how I organize my sewing space, keep it clean, and more!
Anytime I share a photo or video taken in my studio with my cutting table in the background, I get tons of questions about! And I’m not surprised - it’s pretty amazing, and took us a while to figure out. When designing the table, there were a few different things I kept in mind (though sone of these were added later!).

If you’d like to show your support for free content and tutorials, you can buy me a coffee!
Cutting Table Requirements
My table needed to have….
The perfect height so I could stand and cut without back problems (mine is approximately 38” tall)
A place for a roll of batting. I cut about 1.5 rolls of batting a month for the Modern Makes Membership, so this was a must have!
A place for bolts of fabric
Ruler storage that was easy to access
Iron storage that was also easy to access
The ability to double as an ironing station
A huge cutting mat that let’s me easily cut bolts of fabric
The ability to easily move around the room to both access everything stored in the table and rearrange the room for quilt photoshoots
Additional storage for WIPs and remnants

The cubes under the batting roll can either be open, have drawer inserts, or doors. Extra storage, hooray!
WHEW. Just typing that out was exhausting! So, with this very long list, we started brainstorming, and my awesome husband came up with an IKEA hack that were serve as the base of the cutting table.
What You’ll Need
Here’s what you’ll need to create a similar table. Note that you can, of course, customize this however you’d like! To make it easier to figure out what you’ll need, I’ve broken the supply list down by function:
Main Table
2 IKEA Kallax (2 cubes by 4)
4 IKEA Kallax Inserts (I used doors, but drawers are an option too!)
4’ x 8’ sheet of 3/4” plywood
4 Wheels (high/size of wheel determines ultimate height of cutting table; these are 6” tall. Make sure buy wheels that can lock.)
1-1/2” Wood Screws
4’ x 8’ sheet of 3/4” Melamine Panel (for top)
Melamine Tape or Shelf Edging (for edges of top)
8 Corner Braces (to connect the top)
8 L Angle Corner Brackets
Batting Holder
Extras
Large Ironing Mat (full disclosure: this isn’t my favorite, more details below. But it’s cost effective for the size!)


You may also like…


Putting it Together
The beauty of this project is its simplicity and how easy it is to customize to suit your needs. Put simply, we are constructing two Ikea Kallax storage units, screwing them to a plywood base (to hold them together), and putting a piece of Melamine on top to create a smooth single piece cutting surface. Easy, right?
The basic concept can work for most craft spaces, but for a quilting studio we need a few easy customizations to create a Fabric Storage Kallax and a Batting Storage Kallax. This lets me easily spin the table to access whichever side I need. To help you find the information that you care about for your table, I’m going to organize the construction into three sections:
Building a Fabric Storage Kallax
Building a Batting Storage Kallax
Table Assembly

Building the Fabric Storage Side
For clarity, these instructions reference the Ikea Kallax Assembly instructions. At the time of this writing, the Ikea Instructions had a document code of AA-1009448-14 in the bottom right corner.
As far as Ikea furniture goes, the Kallax unit is very simple. It is constructed of a four piece “Outside Frame”, 4 interior “Short Separators” (13” in length), and 3 interior “Long Separators” (26 7/8” in length). When assembled you ordinarily have (8) 13” wide x 13” high cubes that can fit a variety of Ikea accessories or organizers. After customizing our Fabric Storage Kallax we end up with (3) 13” wide x 26 7/8” high storage spaces perfect for fabric bolts. If you’d prefer to store stacks of fabric or half bolts, simple assemble the Kallax without our modifications!
This is just about the easiest Ikea Hack you could accomplish. When putting this together we simply leave out the “Short Separators.” By omitting these four pieces, we will have our three vertical Fabric Bolt sections.
Fabric Storage Kallax Required Tools
Allen wrench (Included with Ikea Kallax)
Ikea Kallax unit
Fabric Storage Kallax Instructions
Following the Ikea assembly instructions, omit the four short separators by skipping steps 2, 4, 5, 7, 8, 10, and 11.


Building the Batting Storage Side
For clarity, these instructions reference the Ikea Kallax Assembly instructions. At the time of this writing, the Ikea Instructions had a document code of AA-1009448-14 in the bottom right corner.
We are starting with the same Ikea Kallax as we did for the Fabric Storage side. After customizing, our Batting Storage Kallax will end up with four 13” wide x 13” high cubes and one 41 5/8” wide x 13” high batting storage space.
To build the Batting Storage Kallax we reconfigure the interior separators. We will use two Short Separators and one trimmed Long Separator as vertical segments, two Long Separators as horizontal segments. In order to install a batting roll, we will add closet bar hardware to the wide storage space.
Batting Storage Kallax Required Tools
Allen wrench (Included with Ikea Kallax)
Rubber mallet or hammer
Circular saw with a fine toothed blade
Masking tape
Measuring tape and pencil
Power drill and drill bits
Batting Storage Kallax Required Parts
Ikea Kallax unit
Closet pole
Closet pole sockets
Melamine tape

Batting Storage Kallax Instructions
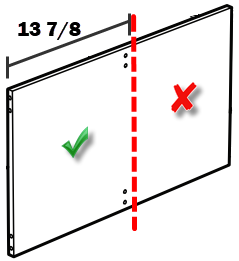
Create the Trimmed Long Separator. Take one Long Separator and trim its height to 13 7/8”. This will include the dowel holes located in the center. Wrap Masking Tape around where you will be cutting to help prevent chipping when using your saw. We used a Power Saw, but a hand saw may also reduce chipping.
Following the Ikea assembly instructions, complete Step 1 by assembling one short and one long piece of the Outside Frame.
For Step 2, install a Long Separator instead of a Short Separator.
For Step 3, install a Short Separator into the center of the Long Separator.
Omit Steps 4 and 5
For Step 6, line up the Trimmed Separator with the dowel holes lined up with the end of the Long Separator installed in Step 2.
For Step 7, gently tap the dowels through the trimmed separator into the Long Separator. Some dowel should stick out to connect the next piece.
For Step 8, install a Long Separator instead of a Short Separator.
For Step 9, install a Short Separator into the center of the second Long Separator.
Omit Steps 10 and 11
Complete Step 12, 13, and 14
Install your Melamine Edging Tape over the exposed particle board on the Trimmed Separator following the instructions on the package. I used an iron to adhere mine scissors to trim to size.
Using your Measuring Tape and Power Drill, install the Closet Pole Sockets in the center of the wide batting role storage space. Make sure it’s centered and even on both sides!
Trim your Closet Pole to securely fit into the Closet Pole Sockets, but still be easy to remove. (You will need to be able to install the Closet Pole with a roll of batting on it, so don’t make it such a tight fit that it’s too difficult to do.)

Table Assembly
To put together the finished table, we are going to attach the Kallax Units to a plywood base, and then attach our melamine cutting table top.
Table Assembly Required Tools
Power Drill and Drill Bits
Circular Saw with a fine toothed blade
Iron
Utility Blade
Paint Brush
Table Assembly Required Parts
Assembled Kallax Units
4’ x 8’ Sheet of 3/4" Plywood
1-1/2” Wood Screws
4 Wheels
4’ x 8’ Sheet of 3/4" Melamine Panel
Masking Tape
Melamine Tape
8 L-Angle Corner Braces
2 3” Mending Plates
Spare or Sample Container White Paint
Optional: Wood Filler and Sand Paper
Optional: Accessories and Anchors
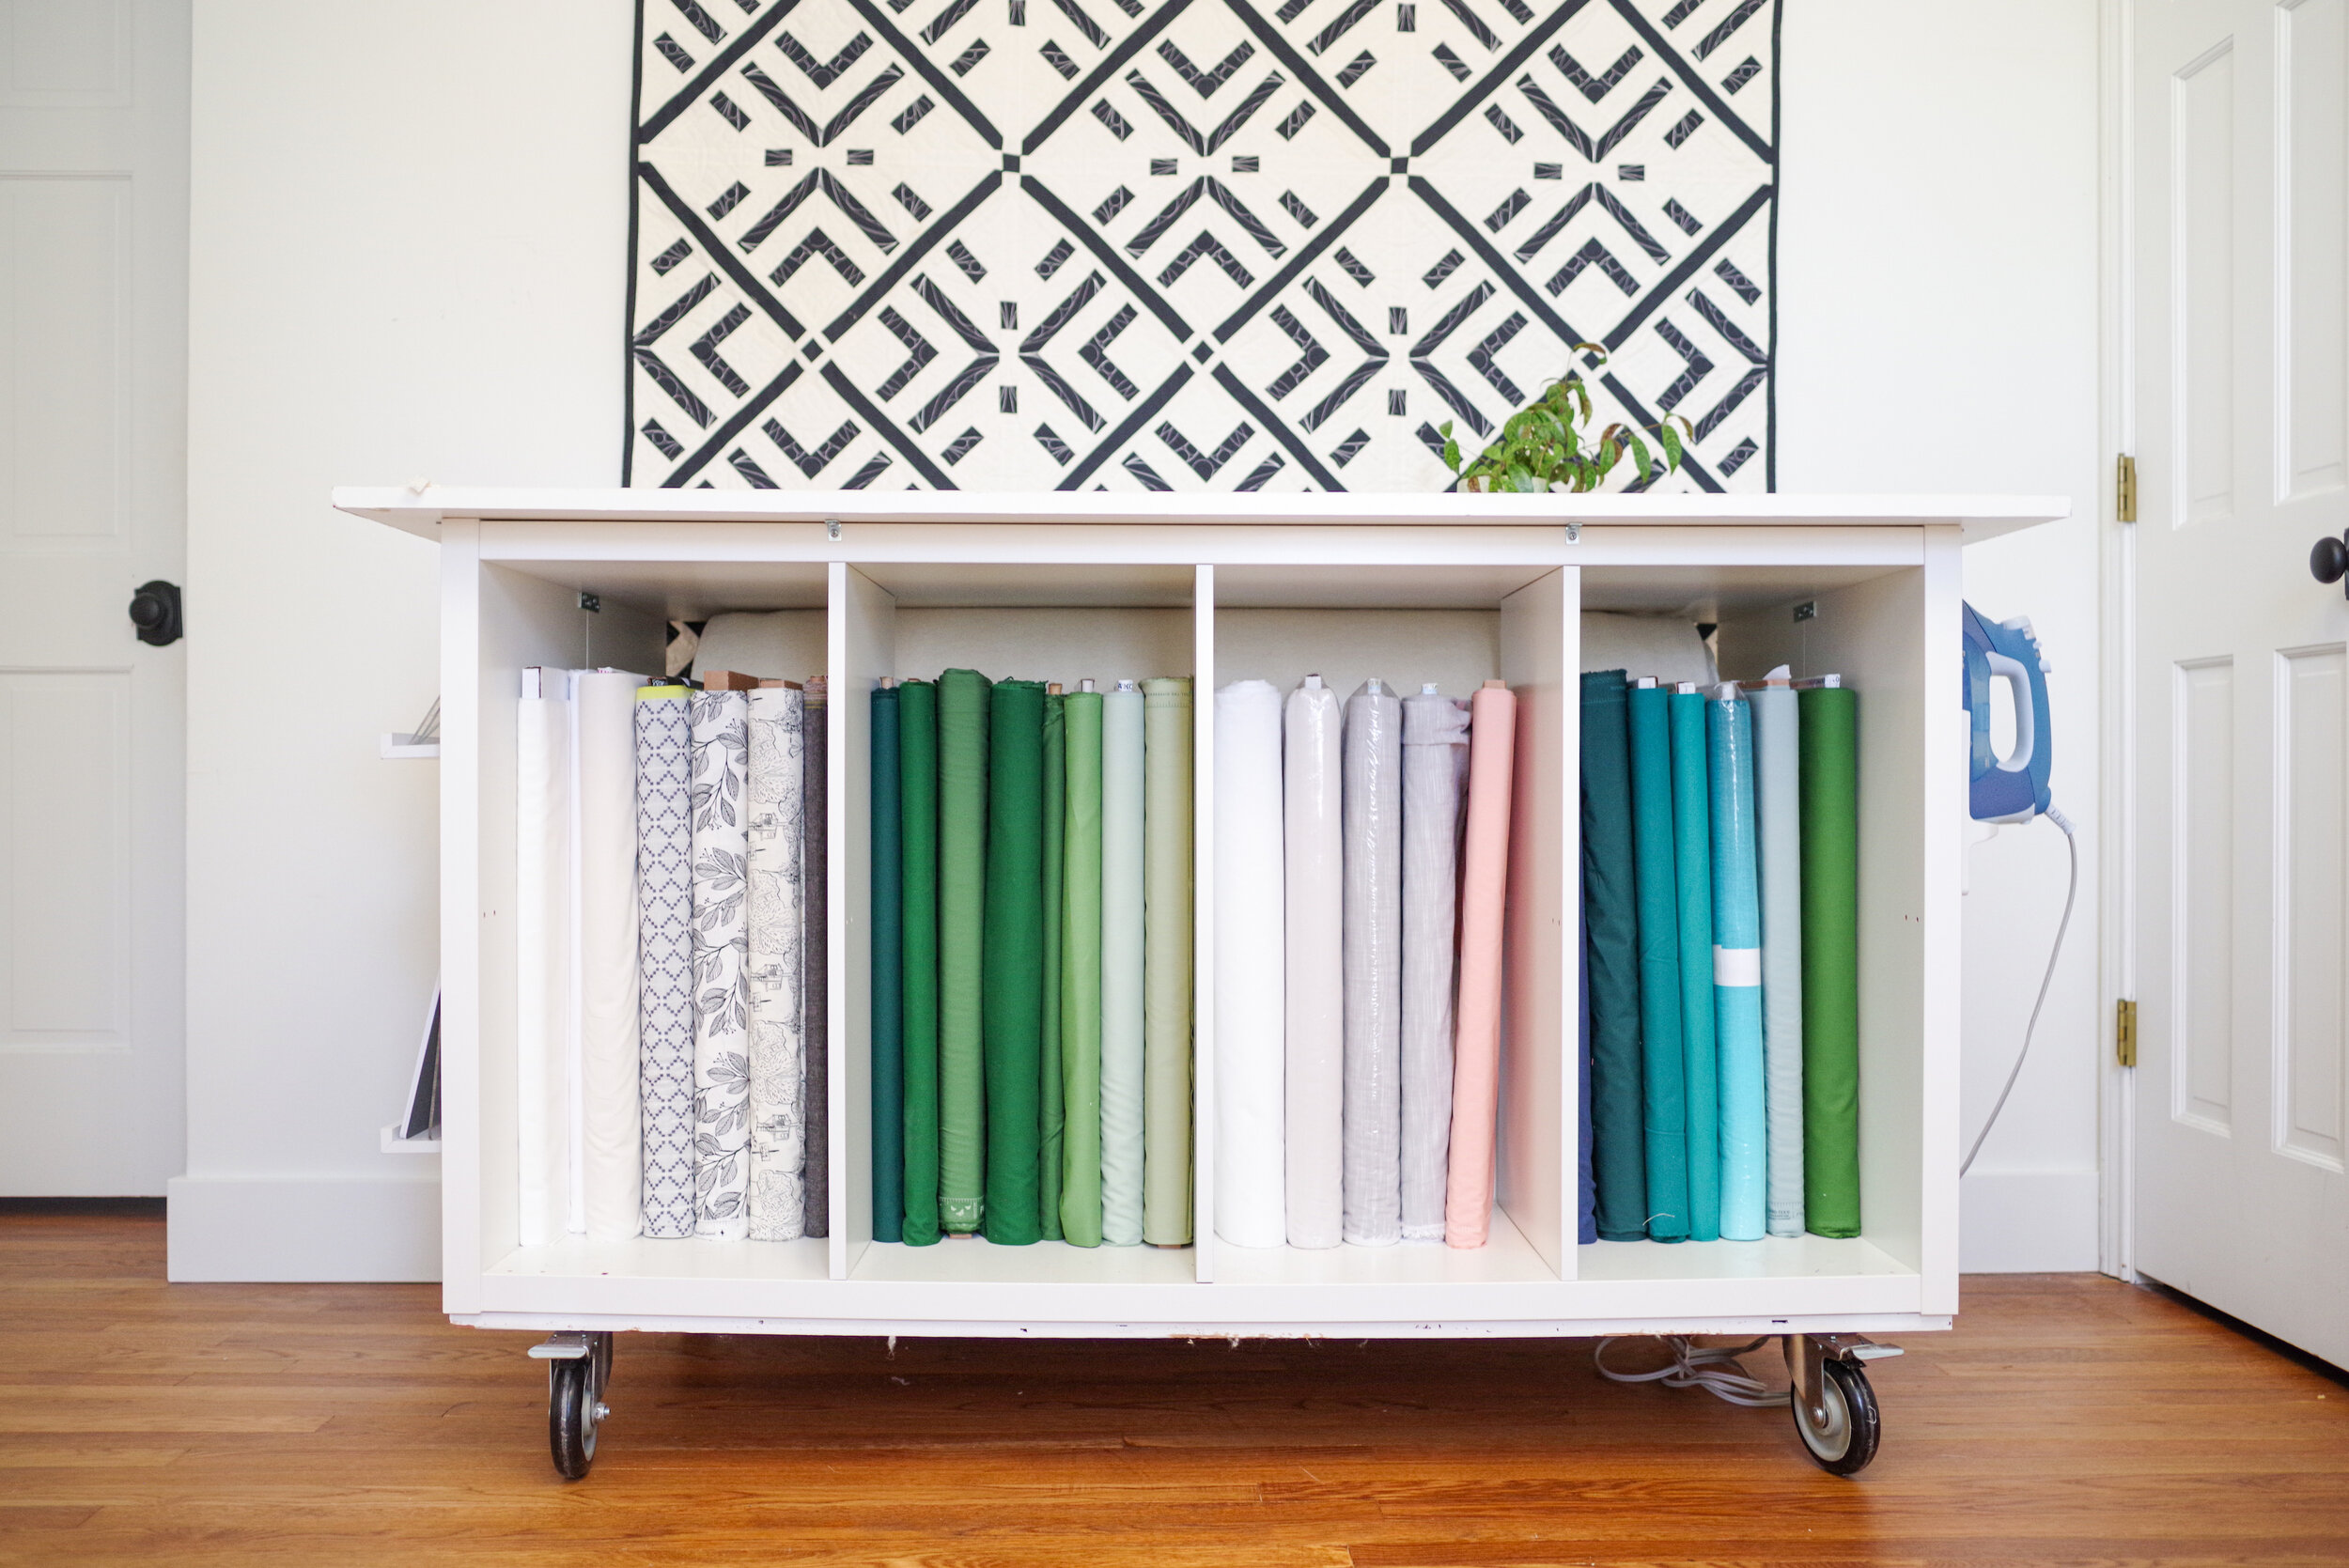
Table Assembly Instructions:
Measure and Cut the 4’ x 8’ Plywood to be the same size as two Kallax Units snuggly fitted together. This is about 30 3/4” x 57 7/8”. I cut mine a little bit smaller (about an inch in each direction) in attempt to make the bottom plywood less visible, but I’m not sure it made much difference.
To “hide” the plywood base I painted the edges white so it would blend in with the Kallax units. To make it even less visible, you could fill in the holes on the plywood edges with wood filer and sand the surface smooth. I did not do this, but I wish I did.
Measure and Cut the 4’ x 8’ Melamine to your ideal final Table Size. I cut mine to 36 7/8” x 63 3/4”, which gives me a 3” overhang. When cutting the Melamine make sure to first wrap masking table all the way around where you will make your cut. Melamine is prone to chipping, and this will help reduce any chipping that occurs. (I filled in my chips with a little bit of white paint to hide them)
Put the two Kallax Units upside down and snuggly pressed together. Use a second person as a helper, or some pipe clamps, to hold the units tightly together without gaps. Then drill pilot holes and screw in the plywood base into the Kallax Units. I used about 14 1-1/2” wood screws equally spaced around the edges, with a few extra on the interior.
Note: Be careful to not screw too tightly. The Kallax Units are hollow and are similar to particle board. If you use too much torque on your drill, you will strip the holes.
Measure about 3” in from each corner and screw in your wheels to the plywood. You’ll want to make sure that the wheels stay sufficiently under the cutting table and not in your way when you move the table, but that you can still use the locking mechanism.
With the Kallax units still upside down, use the two mending plates to attach the two Kallax units together opposite the plywood base. I installed mine on the inside of the units, pushed up against the “top” of the unit (currently against the floor) and screwed into the sides.
You can see the mending plate in the above Batting Roll image above the closet rod hardware.
With a second person helping, very carefully set the Kallax Units on their side and then lift/tip the unit onto the wheels. This process may be easier with the wheels locked.
Note: Be very careful to support both Kallax units and keep them held together while you tip them upright. It may be possible for the stress of lifting the units unsupported to strip the screws holding the Kallax Units to the plywood.
Carefully center your cut Melamine Table Top on the Kallax Units. Install the table top by spacing out the L-Angle Corner Braces along all four sides and carefully screwing them in.
Note: Be careful to not screw too tightly. The Melamine has a particle board interior, and the Kallax Units are similar to particle board. If you use too much torque on your drill, you will strip the holes.
Install your Melamine Edging Tape around the top of your Table Top following the instructions on the package. I used an iron to adhere mine around the edges, and a utility blade to trim any excess.
Note: In my experience, the edging tape is an imperfect solution. On my table, you can still see some of the chips on the corners and I occasionally catch batting or fabric on it. I may try to find some strong white tape to use instead some day.
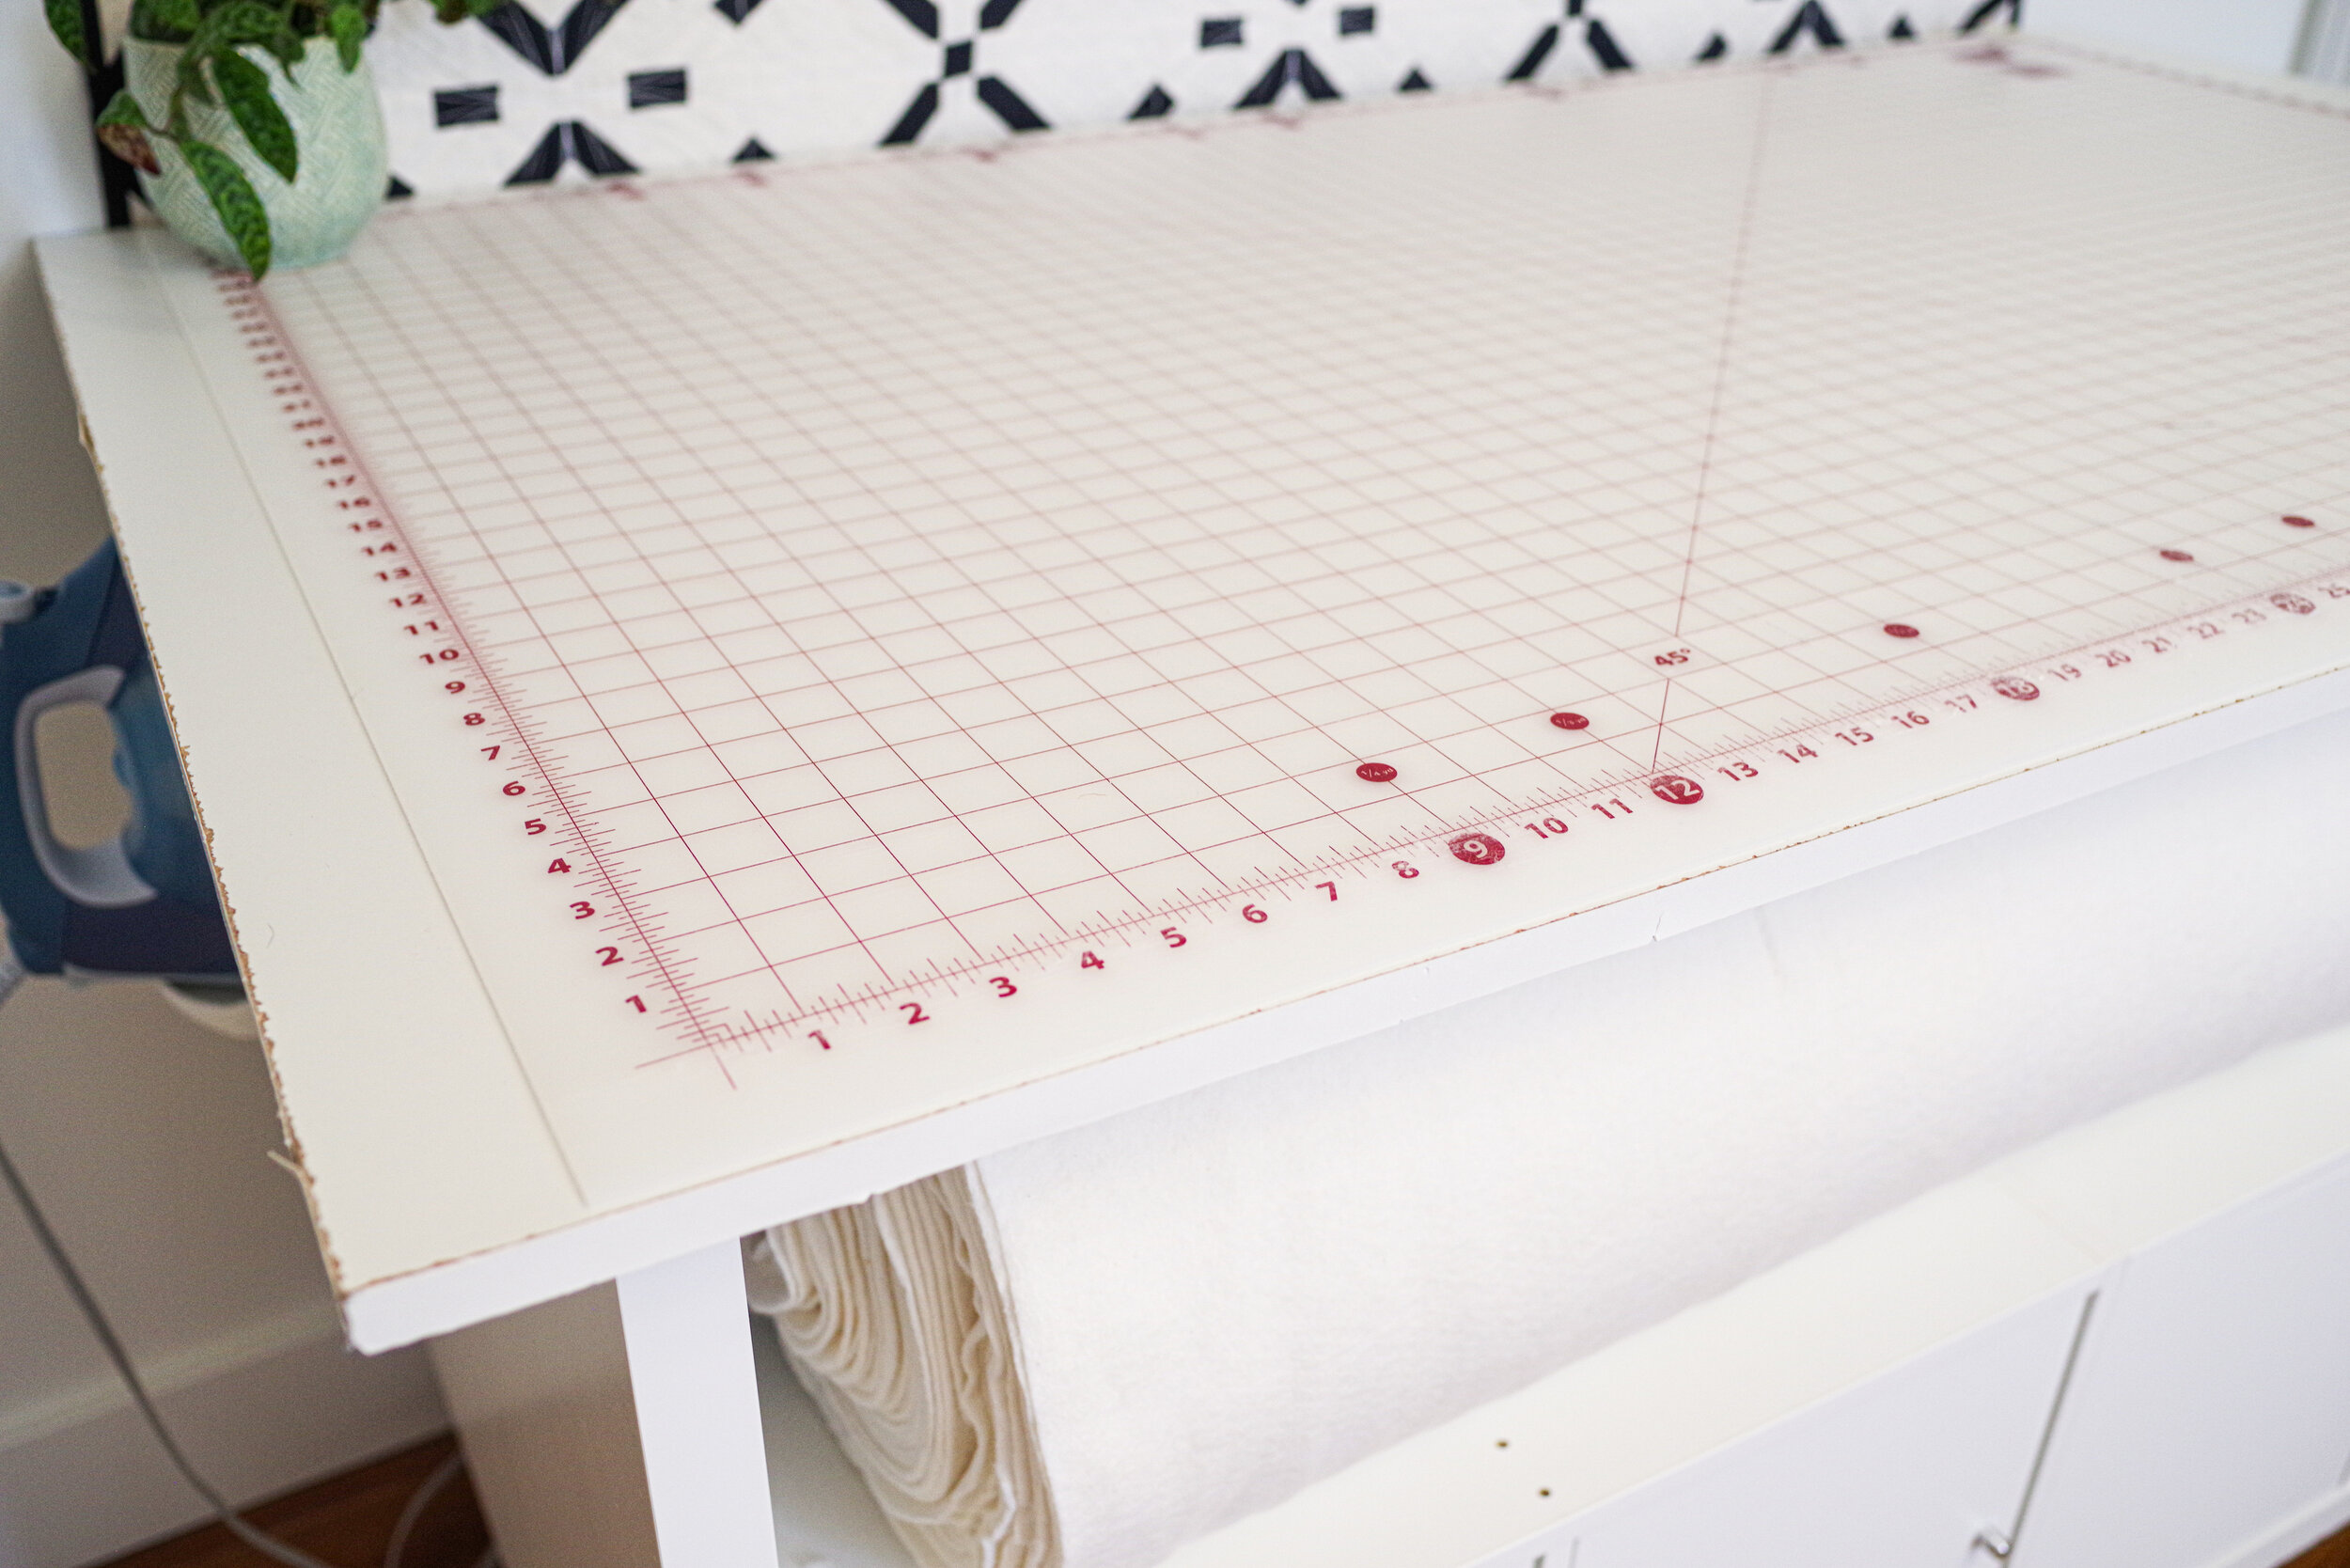
I love this cutting mat! It fits perfectly on this table.
Whew! We did it! Now you can install your accessories. The Kallax Units have a hollow outer frame so you will need to use anchors when installing shelves or an iron holder. I like to use these Toggler Plastic Drywall Anchors because they are nearly flush, have great weight ratings, and I haven’t had them pull out of my walls or my cutting table.

These ledge shelves work wonderfully for storing rulers!
I like to store my pressing mat under the cutting tabled when I’m not using it, then I just pull it off and put it on top whenever I have some pressing to do! Often I’ll also keep a smaller wool mat on the table for block assembly. A note about this pressing mat: It’s quite large, and affordable for its size. However, it does have a strong wool smell (that fades with time), and is a bit scratchier than normal wool pressing mats. I’ve occasionally found stray hairs from it as well.


You might also like…


Note: this post contains Amazon affiliate links, which means that I can make a small commission on some products if you purchase them. These are all the actual products that I used on my own table!